Continuous Deployment Made Simple: Node.js + GitHub Webhooks for Automatic Site Updates
Published on September 25th 2025
I often host web applications and websites that I want to update automatically whenever I push changes to the main GitHub branch. The manual steps of SSHing into a server, running `git pull`, `npm run build`, or executing framework-specific commands like `composer install` or `artisan migrate` for each project are tedious.
This got me thinking about automating the process. What if a service could listen for GitHub pushes and then trigger a series of commands to update the website? This question led me to explore GitHub Webhooks and their potential uses.
GitHub allows you to configure webhooks for your repositories, which are automated HTTP requests sent when specific events occur. For example, webhooks can notify you when someone creates a pull request, pushes new code, or creates an issue.
Let's build a simple Node.js service to handle these webhooks. It will listen on port 8080 for push events to the repository. Upon receiving an event, it will execute `git pull` to update the local code. For this example, we'll assume a simple workflow without merge conflicts.
Setting up the GitHub Webhook
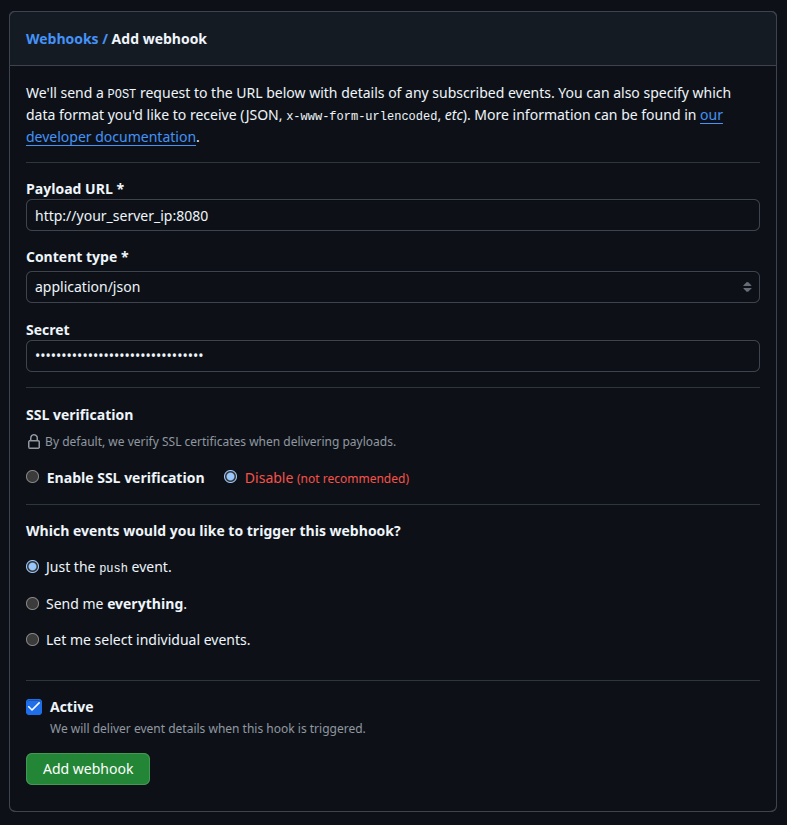
To begin, navigate to the GitHub repository you want to automate and follow these steps:
- Go to your repository's `Settings` tab.
- In the sidebar, click on `Webhooks`.
- Click the `Add webhook` button. You may be prompted to confirm your password.
- In the `Payload URL` field, enter the public URL where your service will be listening. For this guide, it will be `http://your_server_ip:8080`.
- Change the `Content type` to `application/json`. Our Node.js service will be designed to parse a JSON payload.
- In the `Secret` field, enter a strong, unique password. This secret is crucial for securing your webhook endpoint, as it allows your server to verify that incoming requests originate from GitHub.
- For `SSL verification`, you can select "Disable" for this example, as our local Node.js service will run over HTTP without an SSL certificate. For a production environment, using SSL is highly recommended.
- Under "Which events would you like to trigger this webhook?", select `Just the push event`. We only need to act when new code is pushed to the repository.
- Ensure the `Active` checkbox is selected.
- Finally, click `Add webhook` to create it.
Setting up the project on your web server
First, ensure your website's repository is cloned on your server. This guide assumes you have an existing project running. Depending on your hosting environment, you may also need to open port `8080` to allow incoming webhook requests.
Now, let's create the Node.js service that will listen for these webhooks. This script will start a web server on port `8080`, validate incoming requests using the secret we configured, and then execute a `git pull` to update the code.
Let's set up the project. Navigate to your home directory, create a new folder for the service, and initialize a Node.js project.
cd ~
mkdir ~/NodeWebhooks
cd ~/NodeWebhooks
npm init -y
We'll use the `dotenv` package to manage our configuration variables. Install it with npm:
npm install dotenv
Next, create a `.env` file to store your secret and repository path. This keeps your sensitive information out of the main script.
nano .env
Add the following lines to your `.env` file, replacing the placeholder values with your actual secret and repository path:
SECRET=your_secret_here
REPO_PATH=/path/to/your/repo
Now, create the main application file, `webhook.js`:
nano webhook.js
Add the following code to `webhook.js`. It will now load the configuration from the `.env` file we just created.
const path = require('path');
require('dotenv').config({ path: path.resolve(__dirname, '.env') });

const http = require('http');
const crypto = require('crypto');
const { exec } = require('child_process');

// Your webhook secret and the path to your repository
const SECRET = process.env.SECRET;
const REPO_PATH = process.env.REPO_PATH;

http.createServer(function (req, res) {
    let body = [];
    req.on('data', function(chunk) {
        body.push(chunk);
    }).on('end', () => {
        body = Buffer.concat(body).toString();

        // Validate the signature
        const signature = req.headers['x-hub-signature-256'];
        if (!signature) {
            return res.end();
        }

        const hmac = crypto.createHmac('sha256', SECRET);
        const digest = 'sha256=' + hmac.update(body).digest('hex');

        if (signature === digest && req.headers['x-github-event'] === 'push') {
            console.log('Push event received. Pulling changes...');
            exec('git pull', { cwd: REPO_PATH }, (err, stdout, stderr) => {
                if (err) {
                    console.error(`exec error: ${err}`);
                    return;
                }
                console.log(`stdout: ${stdout}`);
                console.error(`stderr: ${stderr}`);
            });
        }

        res.end();
    });
}).listen(8080);
Here's a breakdown of the script:
- It first loads environment variables from the `.env` file using `dotenv`.
- It then uses Node.js's built-in `http`, `crypto`, and `child_process` modules.
- An HTTP server is created on port `8080` to listen for incoming requests.
- When a request is received, it collects the entire request body. This is important because webhook payloads can arrive in multiple chunks.
- It validates the request by creating a `sha256` HMAC digest of the payload using your `SECRET` and comparing it to the `x-hub-signature-256` header sent by GitHub. This ensures the request is authentic.
- It checks the `x-github-event` header to confirm the event is a `push`.
- If the signature is valid and the event is a push, it executes `git pull` within the specified repository path (`REPO_PATH`) to update the code.
Testing the Webhook
To test the webhook, run the script from your terminal. Make sure you are in the `NodeWebhooks` directory.
cd ~/NodeWebhooks
node webhook.js
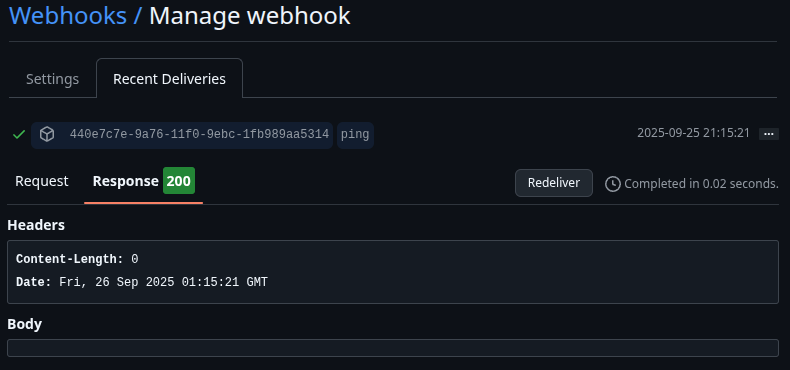
Return to your project's page on Github.com. Click on the Settings tab in the top menu bar on your repository's page, followed by clicking Webhooks in the left navigation menu. Click Edit next to the webhook you set up. Scroll down until you see the Recent Deliveries section.
Running the Node Webhook Listener as a System Service
To ensure our webhook listener runs permanently and starts on boot, we'll configure it as a `systemd` service. This allows us to manage it just like any other system service.
First, create a new service file using a text editor like `nano`:
sudo nano /etc/systemd/system/webhook.service
Add the following configuration to the file. This unit file tells `systemd` what our service is, who should run it, and where to find the script.
Make sure to replace `user` with your username.
[Unit]
Description=GitHub Webhook Listener
After=network.target

[Service]
Environment=NODE_PORT=8080
Type=simple
User=user
ExecStart=/usr/bin/nodejs /home/user/NodeWebhooks/webhook.js
Restart=on-failure

[Install]
WantedBy=multi-user.target
Next, reload the `systemd` daemon to recognize the new service, and then enable it to start on boot:
sudo systemctl daemon-reload
sudo systemctl enable webhook.service
You can now start the service manually:
sudo systemctl start webhook
To verify that the service is running, check its status:
sudo systemctl status webhook
You should see output indicating that the service is active and running:
● webhook.service - GitHub Webhook Listener
Loaded: loaded (/etc/systemd/system/webhook.service; enabled; vendor preset: enabled)
Active: active (running) since Fri 2025-09-25 19:00:41 UTC; 21s ago
Main PID: 9912 (nodejs)
    Tasks: 6
Memory: 7.6M
    CPU: 95ms
CGroup: /system.slice/webhook.service
        └─9912 /usr/bin/nodejs /home/user/NodeWebhooks/webhook.js
With the service active, you can now push commits to your repository, and the webhook will automatically trigger the deployment script on your server.
Conclusion
This simple Node.js service provides a powerful foundation for a CI/CD pipeline. You can easily extend it to handle multiple repositories or execute more complex deployment scripts, such as `git pull && npm run build` for a Node.js project or `git pull && composer install && php artisan migrate` for a Laravel application. For enhanced security, you can even store your repository outside the webroot, have the script run a build process, and then sync only the compiled assets to the public directory. This ensures your source code and `.git` folder are never exposed on the live server. The possibilities are endless.