Raspi-Streamer: A Raspberry Pi streaming device
Published on September 16th 2025
Check out the project on GitHub: raspi-streamer
I've always wanted a way to quickly and easily stream my game consoles to Twitch, PeerTube, or my Owncast server. I envisioned a dedicated device that I could simply press a button on to start streaming—no dragging out a laptop, connecting a web of cables, or fiddling with OBS settings. I just wanted to press a button and go live.
This is what sparked the Raspi-Streamer project. I knew this could be done with FFmpeg, which wouldn't require heavyweight streaming software like OBS. The big question was whether a Raspberry Pi 5 had enough power to handle it. So, I decided to find out.
Using a USB capture card, I was able to use a single FFmpeg command to capture the video feed and stream it to an RTMP endpoint. While this worked in concept, the stream was choppy and suffered from frequent buffering. I had to dive deep into FFmpeg's documentation to find settings that would work within the Raspberry Pi's hardware constraints.
The project started as a simple bash script running on the Raspberry Pi. Here is an example of my initial test script:
 #!/bin/bash

export AUDIO_OFFSET=0.5          # seconds
export ALSA_AUDIO_SOURCE=hw:0,0
export FRAME_RATE=30
export VIDEO_SIZE=1280x720
export FORMAT=yuyv422
export PRESET=veryfast
export BITRATE=2500             # kbps
export BUFFER_SIZE=5000         # BITRATE * 2 in kbps
export KEYFRAME_INTERVAL=60
export RTMP_SERVER="rtmp://example.com/live/"
export STREAM_KEY="myStreamKey"

ffmpeg \
-itsoffset "${AUDIO_OFFSET}" \
-thread_queue_size 1024 \
-f alsa -ac 2 -i "${ALSA_AUDIO_SOURCE}" \
-f v4l2 -framerate "${FRAME_RATE}" -video_size "${VIDEO_SIZE}" -input_format "${FORMAT}" -i /dev/video0 \
-probesize 32 -analyzeduration 0 \
-c:v libx264 -preset "${PRESET}" -tune zerolatency -b:v "${BITRATE}k" -maxrate "${BITRATE}k" -bufsize "${BUFFER_SIZE}k" \
-vf format=yuv420p -g "${KEYFRAME_INTERVAL}" -profile:v high \
-c:a aac -b:a 96k -ar 44100 \
-use_wallclock_as_timestamps 1 \
-flush_packets 1 \
-async 1 \
-f flv "${RTMP_SERVER}${STREAM_KEY}"
As you can see, I placed all the configuration settings at the top of the script. This made it easy to tweak parameters until the stream was stable and consistent. While testing, I closely monitored CPU usage to ensure I wasn't overwhelming the Raspberry Pi. My only real experience with streaming configuration was through OBS, but I knew it used FFmpeg under the hood. I cross-referenced common OBS settings with their corresponding FFmpeg command-line flags, which was a huge help in dialing everything in.
While this script works great for simple streaming, my ambitions for the project grew. I wanted the ability to stream and record simultaneously, or just record gameplay sessions. I also envisioned streaming a playlist of local video files. It quickly became clear that a single bash script wouldn't be enough to handle this added complexity. I needed a more flexible way to trigger these different actions—a simple web UI, accessible from any device on my network, seemed like the perfect solution.
Python felt like the right tool for the job, but my experience was limited to command-line scripts. This led me to discover Flask, a lightweight web framework for Python. With Flask, I could build a web front-end while using Python for the back-end logic. This setup would allow me to create API routes that could execute my FFmpeg commands, all triggered from a simple web interface.
I started by building out the core features I had envisioned, creating a unique Flask route and Python function for each one: simple streaming, simultaneous streaming and recording, recording-only, and even streaming a local video file. To manage the settings for these different modes, I moved the configuration out of the bash script and into a `.env` file. This allows the web UI to dynamically update the settings, which are then loaded by the Python back-end.
As the project evolved, so did its scope. I soon found myself adding more quality-of-life features: log monitoring, automatic video remuxing after recording, and a way to reliably detect the audio capture device, which Linux would sometimes reassign after a reboot. To make accessing recordings easier, I set up a Samba (SMB) share, allowing me to pull files directly from my main PC. Throughout this process, I took detailed notes, realizing that for this project to be truly useful, it needed to be easily replicable—both for myself and for others.
This documentation effort culminated in the creation of an `install.sh` script that automates the entire setup process on a fresh Raspberry Pi OS Lite image. The goal was to make getting started as simple as possible: a user only needs to install the OS, clone the repository, and run the script. The installer handles everything else, from setting up a Samba share and password-protecting the web UI to automatically detecting the capture device and configuring the app to run as a system service. I have replicated this process many times on a Raspberry Pi 4 and 5 and with 3 different USB capture cards.
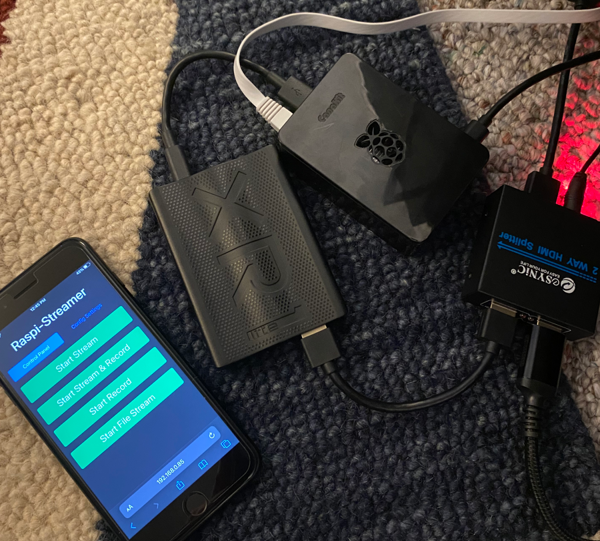
My Raspi-Streamer is now tucked away under my entertainment center, connected to an HDMI selector that hosts all my consoles—from the PS5 and Xbox to the Switch and retro classics. An HDMI splitter feeds the signal to both the capture device and my TV, completing the setup. Now, the process is exactly what I dreamed of: I power on a console, pick it on the switcher, and tap 'Stream' in the web UI on my phone. The best part? Since the Raspi-Streamer captures the switcher's output, I can swap between any console mid-stream without missing a beat.
What began as a simple desire for a one-button streaming solution has evolved into a versatile and powerful tool. The Raspi-Streamer project not only met my original goal but surpassed it, offering features I hadn't even considered at the start. It's a testament to the power of open-source tools like FFmpeg and the flexibility of the Raspberry Pi. I encourage you to check out the project on GitHub, try it for yourself, and see how easy streaming can be.